

A Beginner’s Guide to Making Perfect Petit Fours
Petit fours may sound fancy and difficult to make, but they are actually quite approachable
Petit fours may sound fancy and difficult to make, but they are actually quite approachable for beginner bakers! These bite-sized delicacies have a reputation for being fussy, but with a few simple tricks, you can whip up a beautiful platter of petit fours that looks like it came straight from a Parisian bakery.
What Are Petit Fours?
- Petit fours (pronounced “petty fours”) are small cookies or cakes that are usually around 1-2 inches wide and half an inch tall.
- They have a crispy exterior from being baked at a low temperature for a long time. This drying process creates a delicate outside that contrasts nicely with the soft, moist interior.
- While petit fours can be made in different shapes, most classic ones are squares with rounded edges.
- Traditional petit fours consist of a studded sponge cake base that has been sliced thinly and layered with frostings like buttercream, fondant, or ganache. However, the varieties have expanded and you can now find chocolate, fruit, nut, and citrus options.
- These bite-sized treats are served on platters at special occasions like wedding receptions, baby showers, and afternoon teas. A single petit four provides the perfect hit of sweetness!
Now that you know what sets petite fours apart from other dainty desserts like mini cupcakes or bar cookies, let’s get into the easy process of making them at home. I’ll share tips for achieving bakery-quality perfection on your very first try!
Selecting the Best Recipes
As a new baker, you’ll want to find an accessible, easy-to-follow recipe without too many intricate steps. Here’s what to look for:
- Sponge Cake Base – Start with a simple sponge cake recipe that uses the creaming method. This creates a light texture with tiny air bubbles. Angel food or chiffon cakes are too delicate for petit fours.
- Focus on Flavor – Look for recipes with ingredients like chocolate, espresso, citrus zests, vanilla bean, etc. These will give your petit fours lots of flavor in just a bite or two. Stay away from fruit-flavored sponge cakes, which can make petit fours too soft.
- Smart Frostings – Buttercream, chocolate ganache, fondant, royal icing, and marzipan are classic petit four coatings. Each creates a sweet, rich finish and helps seal in freshness. Frostings with cream cheese or egg whites tend to break down faster.
Need a recommendation? Start with my Easy Vanilla Bean Petit Fours recipe. It uses a simple vanilla creamed sponge cake recipe with tips for a foolproof ganache glaze that turns out picture-perfect every time!
How to Bake Petit Fours Like a Pro

Many novice bakers wonder if petit fours are best made in small tins to achieve their tiny size. But the secret is that they are baked just like a full sheet cake! Follow this professional process:
- Preheat your oven to 325°F to bake low and slow. Line a large rimmed baking sheet with parchment paper or a silicone baking mat.
- Spread your light sponge cake batter thinly and evenly across the pan, making sure to get it into the corners. The layer should be around 1⁄2 inch thick.
- Bake for 30-35 minutes until lightly golden brown and the center springs back when touched. This extended baking is what creates the signature crispy exterior while keeping the interior soft and moist.
- Allow the cake to cool completely in the pan on a wire rack. This ensures it sets up properly before the next steps.
Once cooled, you’ll cut the large cake into the petite sizes. Check out my easy tutorial!
Cutting and Coating Petit Fours
The fun part is turning your cake base into perfect little squares with professional coatings. Here’s a step-by-step guide:
- Use a large knife to trim away the harder edges of the cooled cake. Then make 1-2 inch cuts across the length and width of the cake to create bite-sized squares.
- Carefully swipe away any crumbs using a pastry brush. You want each piece to have straight edges and perfectly square corners. Use an offset spatula to remove squares that don’t cut cleanly.
- Place a piece of wax or parchment paper under a wire rack. Flip each cake square upside down onto the rack so the bottoms become the tops. This creates a flat base for the coatings to adhere to.
- Apply a thin layer of filling, like buttercream or ganache, over the top and sides of each square. Chill briefly so they set up.
- Dip cooled squares into tempered chocolate or pour fondant over them to fully enrobe each petite four. Let any coatings set up before moving them.
That’s how the pros get perfectly polished petit fours every time! The last touch is decorating with garnishes before serving.
Decorating Your Petit Fours Like a Pro

The gorgeous thing about petit fours is how you can customize them with decorations suited for any special occasion. Here are some ideas:
- Dust with powdered sugar or cocoa – This quick finish adds texture and sweetness.
- Drizzle with chocolate or caramel – Use a fork or piping bag to create delicate designs.
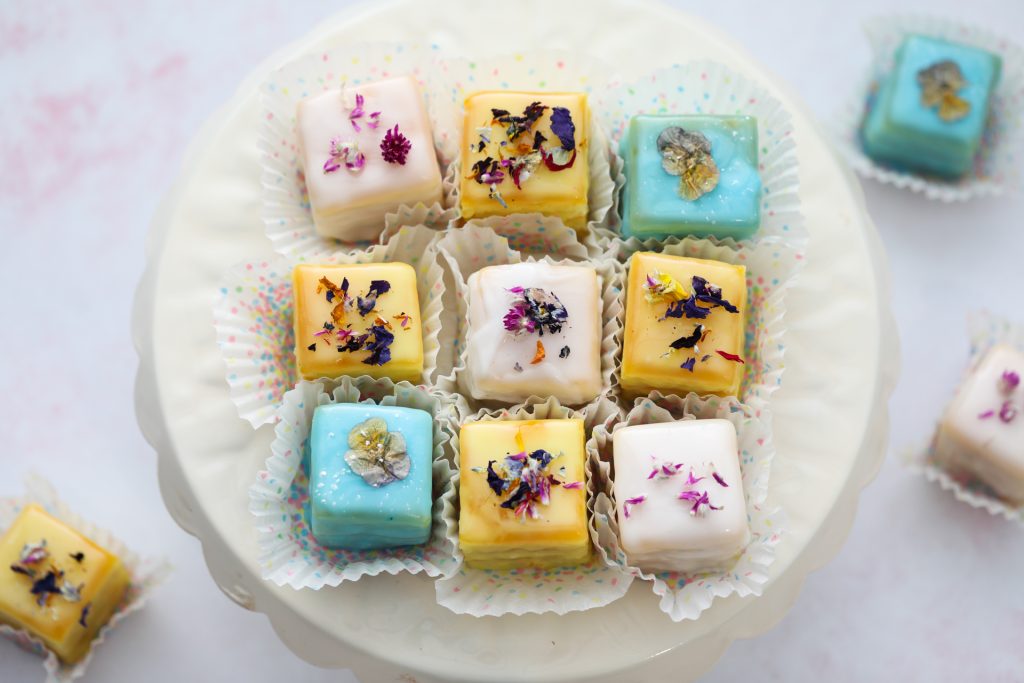
- Add edible flowers or gold leaf – Lavender, roses, or gold accents give a touch of elegance.
- Coat in sprinkles or chopped nuts – Fun colors and crunch appeal to kids and adults alike!
- Pipe borders with royal icing – Outline petit fours in white or pastel icing.
- Imprint designs using molds – Press patterns into chocolate overcoatings before they harden.
Feel free to mix and match decorations across your petit four platter! Contrasting colors, textures, and designs will make them even more stunning.
Petit Fours Flavor Combinations
While traditional petit fours are coated in sweet icings, you can also play with flavors by pairing cake bases with complementary fillings. Try these tasty combos:
- Vanilla cake – Fill with lemon curd, dulce de leche, chocolate ganache
- Chocolate cake – Fill with peanut butter, salted caramel, cherry jam
- Coffee cake – Fill with chocolate hazelnut spread, vanilla buttercream, Irish cream
- Citrus cake – Fill with raspberry puree, mango curd, guava pastry cream
Feel free to mix and match the pastries with tropical fruit curds, nutty spreads, vibrant jam swirls, and boozy reductions inside. Top them with chocolate coats or pretty icings and the flavor options are endless!
How Long Do Petit Fours Last?
Like most pastries, petit fours taste best fresh the day they are baked. However, their low moisture content from that slow, drying bake time allows them to stay fresh longer than other delicate desserts.
Here are some petit four storage guidelines:
- Store in an airtight container at room temp for 2-3 days. Keep away from humidity!
- For longer storage, seal tightly in freezer bags. Freeze for 2-3 months. Thaw overnight before serving.
- Display petit fours on a platter loosely covered in plastic wrap for up to 8 hours during a party.
The crisp exterior created during baking protects the fillings so they don’t get soggy. This means leftover petit fours still retain their texture beautifully!
Common Petit Four FAQs
1. Are petit fours served warm or cold?
Petit fours are served cold or at room temperature after setting up their coatings. Warming them would melt any chocolate, ganache, fondant, or icing toppings!
2. What’s the difference between petit fours and macarons?
Both are French delicacies, but macarons are made with meringue-based cookies sandwiched together with buttercream. Petit fours are made of layered sponge cake squares.
3. Can I make them in advance?
Yes, you can bake and prepare petit fours 1-2 months before an event. Freeze tightly wrapped squares uncoated so you can add fresh frostings and decorations when needed.
4. What goes well with petit fours?
Petit fours pair nicely as part of a dessert course following sorbet or berries with sweet wine or sparkling champagne. The light, fruity flavors contrast beautifully with petit fours!